This project is relatively simple to construct, and will give a "presentable" SSB signal on the lower HF amateur bands. Above 14MHz frequency stability may become a little annoying to the listener due to this TX being VFO controlled, but with a little care, and attention to 2nd oscillator component temperature and mechanical stability, operation on 18MHz should be possible.
The circuit is divided into three sections:
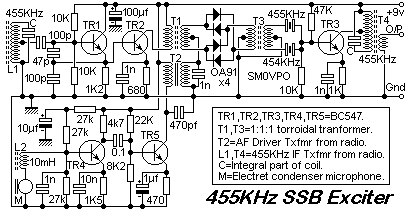
SSB EXCITER
This unit generates an SSB signal at an IF of 455KHz. TR1 forms the carrier oscillator which feeds the mixer and crystal filter. The oscillator coil uses an IF transformer from one of those cheap'n-nasty AM radio's. The filter uses two 455KHz crystals that have a difference frequency of about 1 - 1.5KHz. You will find that the cheaper crystals are never on the same frequency, and they may be "selected" to find a pair with the required difference. To select the crystals temporarily use them instead of L1 in the carrier oscillator circuit and monitor the frequency of oscillation. You can monitor the oscillator on a 160 meter receiver (4th harmonic, 1.820MHz) and look for crystals that give a 4-6 KHz difference in beat-note. Alternatively you could use an SSB crystal filter in the place of the two crystals.
The 455KHz oscillator is tuned to one side or the other of the crystal filter passband and is sufficiently stable to maintain this frequency offset. When monitoring transmission set the carrier oscillator so that the carrier cannot be heard or is at a very low level. The capacitor "C" is an integral part of the 455KHz IF transformer used for L1.
T1 and T3 are constructed using 1/4" ferrite rings. T1: Twist together three lengths of thin enamelled wire and wind 18 turns on the ferrite ring. The tap of the secondary is the START of one winding connected to the END of a second winding. T3: the same as T1 but 4 lengths of enamelled wire are used. T2: the AF driver fransformer (usually blue), stolen from the cheap'n-nasty AM radio. T4: another IF transformer from the same AM radio.
SSB DRIVER
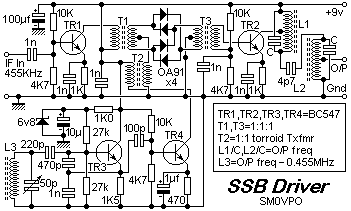
This unit converts the SSB exciter signal to the final frequency you want to operate on. The inductor L3 will determine the stability of the transmitter, so mechanical ridgidity and freedom from "hand capacity" effects are needed. For fixed frequency operation you can use a crystal here; the 50 pf will pull the frequency a little. Not very frequency agile, but VERY stable, and Ok for 28MHz.
L3 is chosen to oscilate 455 KHz LOWER than the band you want. For 3.7MHz you alter the turns to get this to oscillate at 3.245 MHz with the 50 pf variable set to mid position. T1 & T3: Twist together three lengths of thin enamelled wire and wind 10 turns on the ferrite ring. The tapping is the START of one winding connected to the END of a second winding. T2 is the same as T1/T3 but only two wires are twisted together.
L1, L2 and "C" are chosen for the frequency band you want. L1 tapping is 25% of the number of turns, L2 tapping is about 10%. The capacitor "C" should be about HALF the wavelength (40 pf on 80 meters) and L wound to resonate at the correct frequency (this will be vary depending upon the former you use).
SSB POWER AMPLIFIER

Boosts the final optput up to about 1 watt or so. The 1K2 resistor in the PA base biasing circuit may need adjusting for about 300 mV D.C. accross the 2R2 emitter resistor. This seemed to vary with different transistor types. For 14 MHz I used 2N4427 & 2N3866 for the PA but these plastic CB output transistors should work equally well (and not get so hot). Keep the PA kept away from the driver stage. I fitted my PA in a small die-cast aluminium box which also was the heatsink for the PA transistor.
T1 is also wound on a 1/4" ferrite ring; 10 turns with a 2 turn tapping drive to the PA transistor. T2: Twist together two lengths of thin enamelled wire and wind 10 turns on a 1/4" ferrite ring. The center-tap is the START of one winding connected to the END of a second winding.
I recomend that this project be built in three separate stages, each of which can be tested separately. A GDO is almost a necessity for this project but it is possible to build it without one (I built my first 2 with just a scope, a multi-meter and an FT101 HF rig to monitor it).
Transistor types may be changed for almost any type of NPN silicon device you happen to have. I used BC547, but I have used BC108 and 2N706 is some places, all with equal success. The transmitter is powered from 12v DC (13.8v) but a 9.1v zener diode and another BC547 form the voltage regulator for the exciter and driver stages. I will not insult your intellegence with a drawing of the regulator circuit!! (Hi Hi). I hope that you enjoy building this project as much as I did.
Have fun, de HARRY, Upplands Vasby, Sweden
Frank, G3YCC.